A Happy Thought
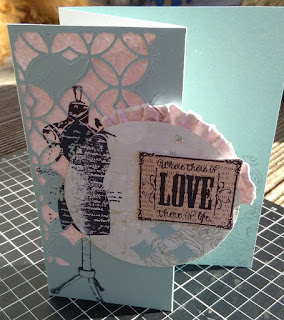
I made a card like this a little while ago for a friends 50th and had a number of compliments on it so thought I would write up a wee tutorial for anyone that would like to try it.

Supplies Used
- 15cm x 30cm light coloured cardstock (Card Base)
- 14.5cm x 14.5cm dark brown cardstock
- 14cm x 14cm Kraft card
- Coloured patterned scrap paper approx. 10cm x 9cm
- 3 craft match sticks
- Tim Holtz Alterations thinlit dies
- 7 Flowers (1 large, 1 med, 5 small)
- Foliage die cut x 2
- Glass beads
- Gel Medium (Transparent)
- Black and/or brown ink
- Heidi Swapp White colour shine
- Adhesive tape
- Décor stamp (I’ve used a dragonfly)
- Sentiment stamp
- Heat tool
- Paint brush
- Bone Folder
- Die Cutting machine (Cuttlebug etc)
Instructions
- Begin by forming your card base. Measure 15cm in from the left hand side and score and then fold. Use your bone folder to give a crisp edge. This should give you a 15cm x 15cm card base.
- Adhere the 14.5cm x 14.5cm dark brown cardstock to the card base, ensure that this is placed in the centre leaving a light boarder around it.
- Ink the edges of the Kraft card with the black or brown ink.
- Place the die in the bottom left hand corner and run through your die cut machine.
- Take a scrap piece of paper and place this on the wrong side of the Kraft card so that you can see it through the die cut section. Adhere in place. Tip: If using adhesive tape, apply this to the back of the Kraft card now - do not remove the backing paper though.

6. Use the gel medium to adhere the match sticks. Starting in the top left hand corner, evenly space them on a downward angle.

7. Using the Colour Shine - spray 2-3 times focusing around the area of the match sticks. Dry with heat tool.

8. Adhere the Kraft card to the card base, again ensuring that this is placed in the
centre. Stamp your Image to the right and below the lowest matchstick.
9. Adhere one of the foliage die cuts to the left of the top matchstick, and the second
to the right hand side of the same matchstick.
10. Using the gel medium adhere the large flower so that it overlaps the first and
second matchstick.
Ensure that you place it low enough that you can still see the foliage above the
flower.
11. Now adhere the medium flower between the second and third matchstick and the
small flowers.

12. Stamp your sentiment and cut this out . (I have used a label style stamp, if you
don't have one you can heat emboss your sentiment with white embossing
powder onto black paper). Back your sentiment with foam tape and adhere
toward the bottom right hand side of the card.
13. With some gel medium on a paint brush randomly swipe this over the embellished
area, including the flowers. Drop your glass beads over these areas and allow to
dry.
14. Once dry lightly shake off any excess beads that did not adhere.
Now you are done!


Comments
Post a Comment